
You can sharpen a kitchen knife at home with a whetstone in 15 to 20 minutes. Soak the stone, hold the blade at 15 to 20 degrees per side, and work through 1000 grit to 3000 or 6000 grit until it slices paper cleanly. A honing rod keeps a sharp edge aligned, but it does not replace the stone.
A dull knife is more dangerous than a sharp one: a dull edge slips off tomato skins instead of biting in, so your hand pushes harder and the blade is more likely to skid. The fix is simple — a basic whetstone, a little water, and a steady angle.
What is the difference between honing and sharpening?
Sharpening removes metal to create a new edge. A whetstone grinds away a thin layer of steel on each side of the blade until the two sides meet in a fresh, keen apex.
Honing realigns an edge that has folded over during use. Every time a knife cuts, the microscopic edge bends slightly to one side, and a honing rod pushes it back into line. Honing removes almost no metal, so it cannot rescue a dull knife — but it keeps a sharp knife cutting well for weeks.
| Method | What it does | Removes metal? | How often | Best for |
|---|---|---|---|---|
| Honing rod | Realigns a folded edge | Almost none | Before heavy use | Maintaining a sharp knife |
| Whetstone | Grinds a new edge | Yes, a thin layer | Every 2–6 months | Restoring a dull knife |
| Pull-through sharpener | Grinds a new edge at a fixed angle | Yes, more aggressively | When the knife is dull | Quick fixes |
| Professional service | Grinds and polishes a new edge | Yes, precisely | Once or twice a year | Valuable or damaged knives |
What do you need to sharpen a knife at home?
You need less gear than the internet suggests: a combination whetstone, water, a towel, and a honing rod.
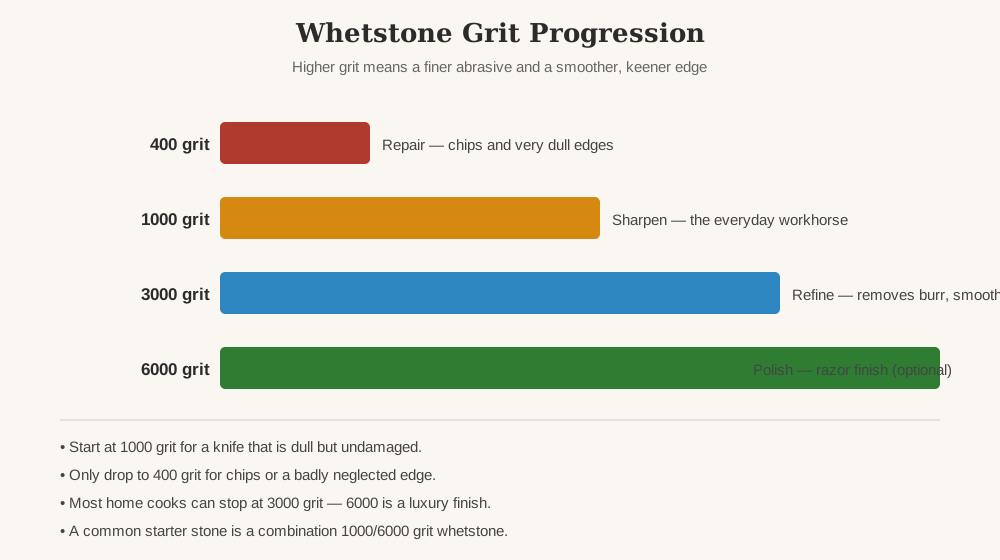
- A combination whetstone, 1000/6000 grit. The 1000-grit side sharpens; the 6000-grit side polishes. Combination stones cost about $20 to $40 as of November 2026 and are the standard starting point recommended by most knife makers.
- Water and a towel. Most whetstones need soaking before use, and a damp towel stops the stone sliding across the counter.
- A honing rod. Fine-cut steel rods are the standard choice for Western knives. Ceramic rods work too but are more aggressive, so use a lighter touch with them.
Skip the expensive stone collection: one combination stone handles every kitchen knife in a normal home.
How do you sharpen a knife on a whetstone?
The whetstone method is the gold standard because it gives you full control over the angle and removes the least metal. Your first knife will take 20 to 30 minutes; with practice, a routine sharpening takes 10 to 15 minutes.
- Soak the stone. Submerge the whetstone in water for about 10 minutes, or until bubbles stop rising. Some ceramic stones only need a splash of water — check the manufacturer’s instructions, because soaking a splash-and-go stone can damage it.
- Set the stone coarse-side up (1000-grit) on a damp towel so it cannot move — a stable stone is essential for holding a steady angle.
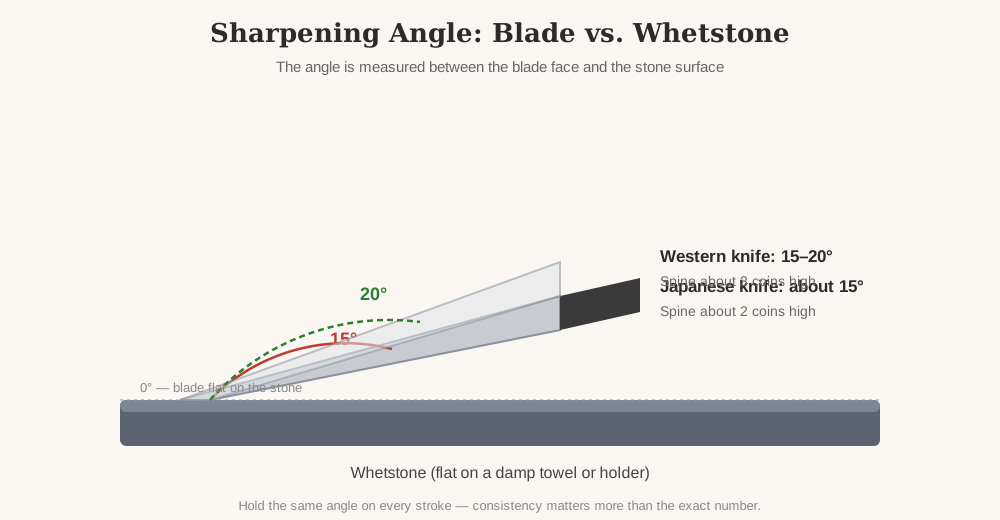
- Find the angle. Place the blade flat on the stone, then lift the spine until the edge meets the stone at the right angle: about 15 degrees per side for a Japanese knife, 15 to 20 degrees for a Western knife. Stack two coins under the spine — on most chef’s knives that gives roughly 15 degrees.
- Sharpen one side. With the edge facing away from you, press the blade gently against the stone with the fingertips of your free hand on the flat of the blade, and push the knife forward and across the stone in a smooth arc, from heel to tip. Use light, even pressure and let the stone do the work. Repeat 10 to 15 strokes, then check for a burr by running your fingertip carefully across (never along) the opposite side of the edge — a slight roughness means the edge is forming.
- Flip and repeat. Turn the knife over and repeat the same number of strokes on the other side until a burr forms there too.
- Refine on the fine side. Flip the stone to the 3000 or 6000-grit side, wet it again, and repeat with lighter pressure and 5 to 10 strokes per side to remove the burr and polish the edge.
- Rinse, dry, and test. Rinse the blade, dry it immediately, and test the edge with the paper test below.
Keep the stone wet throughout — splash water on it whenever the surface starts to dry, because a dry stone clogs with metal dust and stops cutting. Keep the angle consistent on every stroke: a wandering angle rounds the edge over instead of sharpening it, and that is the single biggest reason beginners get poor results.
What angle should you sharpen a kitchen knife at?
The angle is measured per side, from the face of the stone to the face of the blade. A shallower angle makes a sharper edge; a steeper angle makes a tougher edge that stays sharp longer.
| Knife type | Angle per side | Total edge angle | Notes |
|---|---|---|---|
| Japanese double-bevel (gyuto, santoku) | About 15° | About 30° | Harder steel holds a thinner edge |
| Western chef’s knife | 15–20° | 30–40° | Softer steel, built for durability |
| Shun double-bevel knives | 16° per side | 32° | Published by Shun (Kai) |
| Wüsthof standard blades | 14° per side | 28° | Published by Wüsthof |
| Heavy cleaver | About 25° | About 50° | Thick edge for chopping |
If your knife’s maker publishes an angle, use it — it matches the edge the knife left the factory with. Otherwise, 15 degrees is a safe default for Japanese knives and 20 degrees for Western knives. To understand how the thinner Japanese edge changes the way a knife cuts, see our guide to the best Japanese knives under $100 for beginners.
One warning: sharpening a Japanese knife at a Western 20-degree angle quietly grinds away the thin geometry you paid for, and sharpening a soft Western knife at 15 degrees gives an edge that feels razor-sharp for a week, then rolls over quickly, because softer steel cannot support such a thin edge.
How do you use a honing rod correctly?
A honing rod is the fastest maintenance in the kitchen — ten seconds before you start cooking — but only if the technique is right. Skip the dramatic chef’s flourish of steel flashing through the air and use the slow, controlled method instead.
- Plant the rod vertically. Hold the rod by its handle with the tip pressed firmly against a cutting board, so it stands upright and cannot slip.
- Set the angle. Place the heel of the blade against the top of the rod at the same 15 to 20-degree angle you would use on a stone.
- Draw the blade down. Pull the knife down and across the rod in one smooth motion, from heel to tip, as if you were slicing a thin layer off the rod. Use light pressure.
- Alternate sides. Do 3 to 5 strokes per side, alternating. More is not better — over-honing can fold the edge back and forth until it weakens.
Hone once a week or before a big cooking session. If honing stops making a difference — the knife still crushes tomato skins instead of slicing them — the edge is actually dull, and it is time for the whetstone.
Are pull-through sharpeners worth it?
Pull-through sharpeners are the fastest option — drag the knife through a V-shaped slot a few times and the edge improves — but also the least precise, and that trade-off matters.
| Factor | Pull-through sharpener | Whetstone |
|---|---|---|
| Time per knife | 1–2 minutes | 10–20 minutes |
| Skill needed | Almost none | Some practice |
| Angle control | Fixed by the device (usually about 20°) | You choose it |
| Metal removed | More than necessary | Only what is needed |
| Best for | Cheap knives, quick fixes | Good knives, long-term care |
Their carbide or ceramic wheels also remove more metal than a stone does, so a knife sharpened exclusively on a pull-through will wear down faster over the years.
Verdict: a pull-through is reasonable for inexpensive knives you do not care about preserving, and a poor choice for a knife you spent real money on. If you own one good chef’s knife, learn the whetstone. If you are still choosing that knife, our guide to the best chef knife for small hands covers lighter, easier-to-control blades that are also easier to sharpen.
How can you tell if your knife is sharp?
Guessing is unreliable — do not test sharpness with your thumb. Use these two tests instead.
The paper test. Hold a sheet of printer paper by its top edge and slice downward through it. A sharp knife cuts a clean, straight line with no tearing. A dull knife catches, tears, or refuses to bite. Test the heel, middle, and tip separately — the tip is usually the dullest part.
The tomato test. Rest the blade on a tomato skin with no downward pressure and draw it gently forward. A sharp edge bites and slices under its own weight. A dull edge skates across the skin — tomato skins are exactly the kind of slippery surface a dull knife fails on.
If the knife passes the paper test, it is sharp enough for any home cooking task.
How often should you sharpen a kitchen knife?
It depends on how much you cook, not on the calendar. A home cook who prepares dinner most nights will typically need to sharpen a chef’s knife every 2 to 6 months and hone it weekly in between; a knife used only on weekends can go 6 to 12 months between sharpenings.
Stretch the interval by cutting on wood or plastic boards, never glass or granite, which dull an edge in a single session; storing knives in a block or on a magnetic strip, never loose in a drawer; and washing and drying by hand instead of using the dishwasher.
Sharpen when honing no longer restores the cut: if a few strokes on the rod bring the edge back, the knife was only misaligned.
What are the most common knife-sharpening mistakes?
Most sharpening failures come from five avoidable mistakes.
- Pressing too hard. Heavy pressure digs the edge into the stone and creates an uneven bevel. Light, even pressure cuts faster and more evenly.
- Changing the angle mid-stroke. Beginners tend to lift the handle as the curved tip crosses the stone, which rounds the tip over. Slow down at the tip and keep the spine at the same height.
- Skipping grits. Jumping from a 400-grit stone straight to a 6000-grit stone leaves deep scratches the fine stone cannot polish out. Work through the grits in order.
- Sharpening on a dry or dirty stone. A stone clogged with metal dust stops cutting. Keep it wet and rinse it during the session.
- Forgetting the burr. If you never feel a burr form on the opposite side of the edge, you have not sharpened all the way to the apex. Keep going on that side until the burr appears, then switch sides.
- Sharpening serrated knives on a flat stone. A flat whetstone will grind the serrations flat. Serrated bread knives need a tapered ceramic rod worked into each serration, or a professional service.
How do you stay safe while sharpening a knife?
A knife in the middle of sharpening is at its most unpredictable. Keep your fingers behind the edge at all times, on the flat of the blade, never near the cutting edge. Cut away from your body on every stroke, and keep the stone stable — a sliding stone is the most common cause of a sharpening cut.
Work on a clear counter with dry hands and no distractions. Once the knife is sharp, put it straight into its block, onto its magnetic strip, or into a blade guard. Never leave a bare, sharp knife in a sink full of soapy water, where the next person to reach in cannot see it.
Serrated and ceramic knives deserve a different approach: a flat stone destroys serrations, and ceramic is too hard for a standard whetstone, so both are jobs for a tapered rod or a professional. Single-bevel Japanese knives, such as a yanagiba, are sharpened on one side only — follow the maker’s instructions or have a professional show you the technique once first.
Frequently asked questions
How long does it take to sharpen a kitchen knife at home?
About 15 to 20 minutes per knife once you have done it a few times, including soaking the stone. Your first attempt may take 30 minutes.
Can you sharpen a knife with a honing rod?
No — a honing rod realigns an edge that has folded over during use; it does not remove metal. A truly dull knife needs a whetstone or a pull-through sharpener to grind a new edge.
What grit whetstone should a beginner buy?
A combination 1000/6000 grit whetstone. The 1000-grit side sharpens a dull edge, and the 6000-grit side polishes it.
Is it better to sharpen a knife wet or dry?
Wet, always. Water carries away the metal dust and keeps the abrasive cutting cleanly. Soak a standard whetstone for about 10 minutes before use and splash water on it whenever the surface starts to dry.
How do I know when my knife needs sharpening instead of honing?
If a few strokes on the rod restore a clean cut, the knife only needed honing. If it still crushes tomato skins or tears paper, the edge is dull and needs the whetstone.
Featured photo: “Whetstone Knife Sharpening, 2015” by Didriks, licensed under CC BY 2.0, via Wikimedia Commons.