
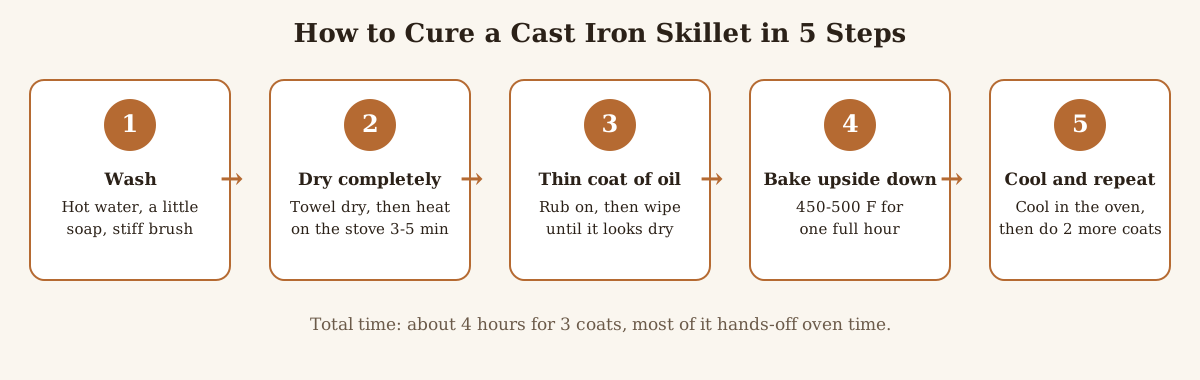
To cure a cast iron skillet, wash it with hot soapy water, dry it completely, rub a very thin coat of oil over every surface, wipe almost all of it off, then bake it upside down at 450–500°F for one hour and let it cool in the oven. Repeat the oil-and-bake cycle two more times for a durable base layer.
A new cast iron skillet looks ready to cook in — and if it is a Lodge, it technically is, because Lodge pre-seasons every pan at the factory. But factory seasoning is a single thin layer meant to protect the pan in the box. Curing it yourself, with two or three more thin coats baked on at home, turns a usable pan into one that releases a fried egg and shrugs off a rinse.
“Curing” and “seasoning” mean the same thing. Curing survives from older cookbooks; seasoning is the term manufacturers use today. Either way, the process is not about flavor — it is about bonding oil to iron with heat until the oil hardens into a slick, rust-proof coating.
This guide follows the method in Lodge’s own care guidance — wash, thin oil, bake hot, cool in the oven — checked against specs, prices, and verified owner reviews. No special equipment is needed, and the whole job takes about four hours, mostly hands-off oven time.
What does it mean to “cure” a cast iron skillet?
Curing a cast iron skillet means coating it with a thin layer of oil and heating it past the oil’s smoke point until the oil hardens onto the iron. That hardened layer — seasoning — keeps water and air away from the bare iron so it cannot rust, and fills the pores of the cast iron so food slides instead of sticking.
The chemistry has a name — polymerization. Heated past its smoke point, oil molecules link together into a hard, dry film bonded to the metal. That is why seasoning is not the same as oiling a pan before cooking: oil wiped on cold stays liquid and washes off, while oil baked on at 450–500°F becomes part of the pan’s surface.
A well-cured skillet is dark, smooth, and dry to the touch — never sticky or tacky. Stickiness means the oil never got hot enough, or was applied too thickly, to polymerize fully.
One honest expectation: three oven coats give you a solid base, not a non-stick miracle — a new cured skillet will still grab an egg a little, then become slick after a few weeks of regular use.
What do you need to cure a cast iron skillet?
Almost nothing you do not already own — the total cost is roughly $5–$15 if you buy the oil from scratch.
| Supply | What it is for | Typical price as of November 2026 |
|---|---|---|
| Neutral cooking oil or shortening | The seasoning itself — canola, vegetable oil, or melted shortening | About $4–$6 |
| Dish soap | Washing the pan before the first coat | Already in your kitchen |
| Paper towels or a clean lint-free rag | Applying oil and wiping it back off | Already in your kitchen |
| Aluminum foil or a sheet pan | Catching drips on the rack below the skillet | Already in your kitchen |
| Oven mitts | Handling a 450°F pan safely | Already in your kitchen |
| Stiff brush or non-metal scrub pad | Cleaning a new pan or light residue | About $3–$5 |
Skip the specialty “cast iron seasoning oil” blends sold for $10–$15 a bottle — Lodge recommends plain vegetable oil, melted shortening, or canola oil. Technique matters far more than the oil.
How do you cure a cast iron skillet step by step?
Read through all seven steps once before you start. The method below follows Lodge’s official seasoning procedure, and the details matter — especially wiping the oil off and baking hot enough.
Step 1: Wash the pan with hot water and a little soap. Even a brand-new skillet should be washed first, to remove wax or dust from shipping. Lodge states that a little modern dish soap is fine on cast iron, because it no longer contains the lye that once stripped seasoning. Rinse well.
Step 2: Dry it completely. Towel-dry the skillet, then set it on a burner over low heat for 3–5 minutes until every drop of water has evaporated. Cast iron rusts fast — a damp pan can show orange spots within hours — so never oil a pan that is even slightly wet: trapped moisture under the seasoning layer causes rust and flaking later.
Step 3: Rub a very thin coat of oil over the whole pan. While the pan is still warm, pour about a teaspoon of oil into it and rub it over every surface with a paper towel: cooking surface, outside walls, bottom, and handle. Then take a clean towel and wipe almost all of it off — the surface should look dry and matte, not shiny or wet. This is the single most important step. Too much oil is the most common seasoning mistake — thick oil cannot polymerize evenly, so it bakes into a sticky, gummy layer that peels.
Step 4: Place the skillet upside down in the oven. Put the pan upside down on the middle rack, with foil or a sheet pan on the rack below to catch drips, so excess oil cannot pool in the cooking surface and harden into bumps.
Step 5: Bake at 450–500°F for one hour. Heat the oven to 450–500°F — the range Lodge recommends — and bake for a full hour, so the oil passes its smoke point and bonds to the iron. Lower temperatures leave a soft, greasy film, and the pan will smoke a little as the oil polymerizes, so turn on the vent fan.
Step 6: Let it cool in the oven. Turn the oven off and leave the skillet inside until it is cool enough to handle, about 30–45 minutes. Do not rush this with cold water — a hot pan can warp or crack.
Step 7: Repeat steps 3–6 two more times. One layer is thin protection; three thin layers give a noticeably tougher and more even coating. After three rounds the pan will look dark brown or grey-black rather than jet black — that is normal, and the deep black finish builds up over months of regular cooking.
Which oil is best for seasoning cast iron?
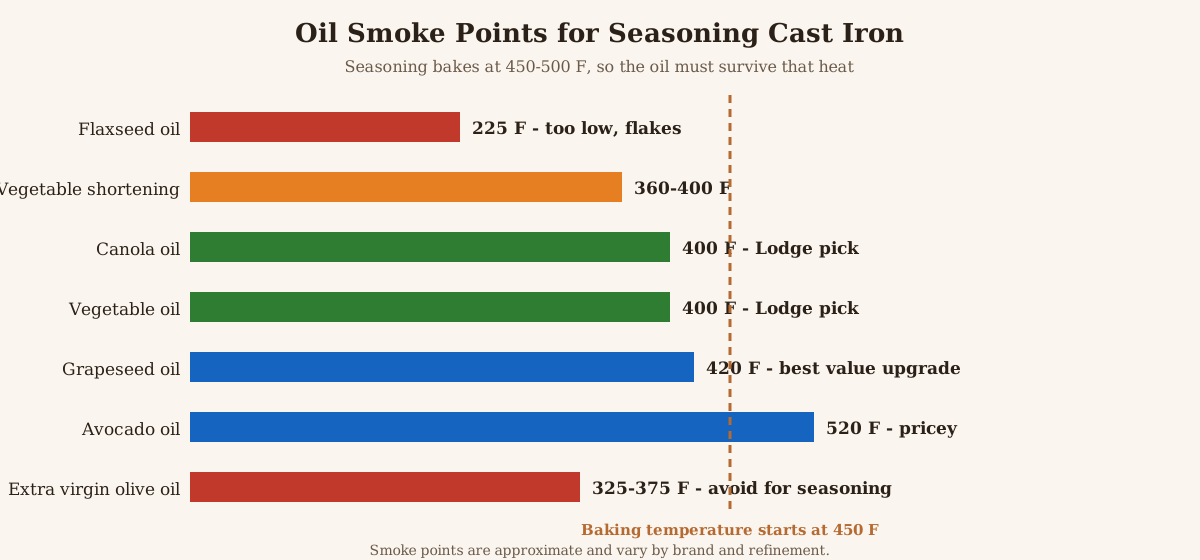
The best oil for seasoning cast iron has a high smoke point, a neutral flavor, and a low price — which is why Lodge recommends vegetable oil, melted shortening, or canola oil. It must survive the 450–500°F baking temperature long enough to polymerize instead of burning off.
| Oil | Smoke point | Seasoning result | Cost | Our take |
|---|---|---|---|---|
| Canola oil | About 400°F | Durable, even layer | Low, about $4–$6 a bottle | Best all-round choice for beginners |
| Vegetable oil | About 400°F | Reliable, even layer | Low, about $4–$6 a bottle | Lodge’s factory-seasoning oil |
| Grapeseed oil | About 420°F | Hard, slick layer that builds fast | Moderate, about $8–$10 a bottle | Best upgrade if you want a harder finish |
| Vegetable shortening | About 360–400°F | Classic, durable layer | Low, about $4–$5 a tub | Best for the traditional stovetop method |
| Avocado oil | About 520°F | Slick finish, no off-flavors | High, about $10–$14 a bottle | Works well but overpriced for seasoning |
| Flaxseed oil | About 225°F | Hard at first, then brittle and flaky | High, about $10–$12 a bottle | Not recommended — see below |
| Extra virgin olive oil | About 325–375°F | Sticky, gummy residue | Moderate | Do not use for seasoning |
Flaxseed oil is the big exception to the “any oil works” rule. It became popular after a viral blog post praised its hard, glassy finish, but its smoke point is only about 225°F — far below the 450–500°F oven. The oil polymerizes too fast and too hard, forming a brittle layer that flakes within weeks, and it costs two to three times more than canola oil. Skip it.
Grapeseed oil is the best upgrade. With a smoke point of about 420°F, it polymerizes into a hard, flexible layer. If you already own a bottle, use it; if you are buying oil specifically for seasoning, canola oil does the same job for half the price.
Do not use extra virgin olive oil or butter. Their smoke points — about 325–375°F for olive oil, lower still for butter — sit below the baking temperature, so they smoke heavily and leave a sticky residue instead of a hard coating.
The same thin-coat, high-heat method works for carbon steel pans. Our guide to how to season a carbon steel pan the first time walks through the same process for carbon steel.
How many times should you season a cast iron skillet?
Season a new cast iron skillet three times, with a thin coat of oil baked at 450–500°F for one hour per round. Three thin layers give a durable base; one layer is thin enough that a single acidic meal or an aggressive scrub can wear through it.
More is not always better — six or eight oven coats add little beyond three. The fastest way to build seasoning is to cook in the pan: a skillet used three or four times a week becomes noticeably more non-stick within a month.
What mistakes should you avoid when seasoning cast iron?
Most seasoning failures come from rushing one step — these are the most common ones, and all are easy to prevent.
Using too much oil. A pan that comes out of the oven sticky or tacky had too much oil on it — wipe the oil off until the pan looks dry before it goes in the oven. If your pan already came out sticky, scrub it clean and start the coat again instead of baking another layer on top of a gummy one.
Baking at too low a temperature. Oil baked at 350°F does not polymerize — it just sits on the surface and stays greasy. The oven must reach 450–500°F for a full hour, so check it with an inexpensive oven thermometer if you suspect it runs cool.
Seasoning a wet pan. Water trapped under the oil layer causes rust and makes the seasoning flake off in sheets — always heat the pan on the stove until every drop has evaporated before applying oil.
Using the wrong oil. Olive oil, butter, and flaxseed oil all fail for different reasons — low smoke points, or a brittle finish. Stick with canola, vegetable oil, shortening, or grapeseed oil.
Cooking acidic food too soon. Tomato sauce, wine, and citrus are fine in a well-seasoned skillet, but a brand-new seasoning layer is thin and vulnerable. Give the pan a few weeks of regular cooking first, starting with something fatty like bacon.
Expecting a perfect non-stick surface on day one. A freshly cured skillet is protected, not magical — eggs may still stick a little for the first few cooks, but it improves quickly with use.
How often do you need to re-season a cast iron skillet?
A skillet used regularly and cared for properly rarely needs a full re-seasoning — the 60-second routine after each cook maintains the seasoning.
Re-season when food starts sticking where it used to slide, the surface looks dull grey or shows bare metal, rust spots appear, or the pan was scrubbed hard or soaked.
A full re-seasoning is the same three-coat oven method; for minor wear, one thin coat baked for an hour is enough.
How do you take care of a seasoned skillet every day?
Daily care is a 60-second routine — wash, dry, oil lightly — and the whole secret to a skillet that lasts decades.
Wash with hot water right after cooking. A little dish soap is fine — Lodge confirms that modern dish soap does not strip seasoning. Use a stiff brush or chainmail scrubber for stuck food, and never soak the pan or put it in the dishwasher.
Dry it on the stove, every time. Towel-dry the skillet, then set it on a burner over low heat for 3–5 minutes until the water has evaporated — this one habit prevents almost all rust.
Rub in a few drops of oil while the pan is warm. A teaspoon of canola or vegetable oil, rubbed over the cooking surface and wiped until it looks dry, replaces the seasoning lost in washing. Store the pan in a dry place.
Use it often. Cast iron improves with cooking — the seasoning gets tougher and more non-stick the more you fry, sear, and bake in it. A cured skillet is at its best searing a steak; our cast iron vs carbon steel steak comparison breaks down searing and heat retention side by side.
A cast iron skillet is one of the few kitchen tools that genuinely gets better with age. Lodge sells its classic 10.25-inch skillet for about $20–$30 as of November 2026, and a cured pan can outlast its owner.
Frequently asked questions
What does it mean to cure a cast iron skillet?
Curing means coating the skillet with a thin layer of oil and baking it past the oil’s smoke point so the oil hardens into a protective layer called seasoning — the two words describe the same process.
Do I need to cure a brand-new Lodge skillet?
No — Lodge pre-seasons every pan at the factory, so it is ready to cook in out of the box. Two or three home-cured coats give a tougher, more non-stick base.
What temperature do you cure cast iron at?
Bake at 450–500°F for one hour per coat, following Lodge’s seasoning guidance — the oil must pass its smoke point to polymerize, and lower temperatures leave a soft, sticky film.
What is the best oil to season cast iron with?
Canola oil is the best all-round choice: a smoke point of about 400°F, neutral flavor, and about $4–$6 a bottle. Vegetable oil and melted shortening work equally well, and grapeseed oil is the best upgrade.
How do I know if my seasoning is ruined?
Sticky, gummy patches mean too much oil or too little heat — scrub the pan clean and re-season. Flaking or dull grey patches mean worn seasoning, which fresh coats fix. A skillet is only ruined if it is cracked or deeply pitted.
Can I use soap on a cast iron skillet?
Yes — Lodge states that a small amount of modern dish soap is fine, because it no longer contains the lye that once stripped seasoning. Wash with hot water and soap, dry on the stove, and rub in a few drops of oil.