
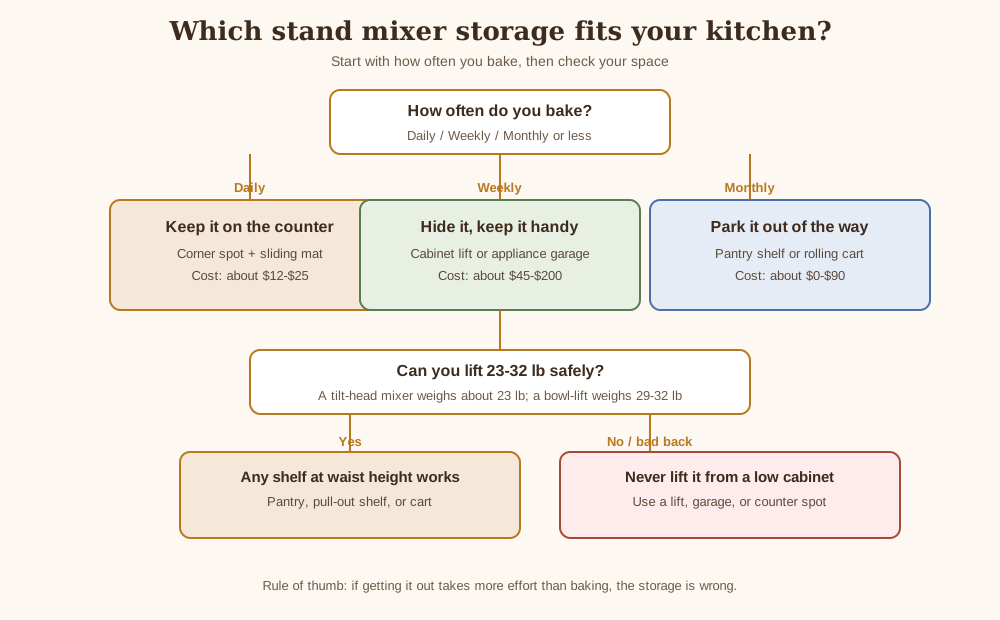
The best stand mixer storage depends on how often you bake: daily bakers should keep it on the counter in a corner spot, weekly bakers do best with a cabinet lift or an appliance garage, and occasional bakers can park it on a pantry shelf or a rolling cart. Height, weight, and lifting effort decide the rest.
A stand mixer is the hardest appliance to store: too tall for most cabinets, too heavy to lift daily, too bulky for the counter — so it ends up hogging the counter or buried in a cabinet where it never comes out. The nine ideas below cover every budget, from a $12 sliding mat to a $150 cabinet lift.
How do you decide where your stand mixer should live?
Start with how often the mixer comes out. If you bake several times a week, storage that requires lifting, unplugging, and carrying will quietly kill the habit — you need the mixer on the counter or on a lift that brings it to counter height.
If you bake once a month or less, the mixer can live farther away — a pantry shelf or a rolling cart works, because fetching it is rare. The mistake is storing a weekly-use mixer like a monthly-use one. Then consider lifting: a tilt-head Artisan weighs about 23 pounds, a bowl-lift 29 to 32 — a two-hand lift from a low cabinet while bent over. If that sounds unpleasant, rule out storage below waist height.
What should you measure before you choose a storage spot?
Three numbers decide it: height with the head down, footprint, and clearance above. A tilt-head needs extra height when the head tilts back, so measure with the head up too.
| Mixer type | Height (head down) | Weight | Fits under cabinets? |
| — | — | — |
| KitchenAid Artisan Mini (3.5 qt) | 12.3 in | About 18 lb | Yes |
| KitchenAid Artisan tilt-head (5 qt) | 13.9 in | About 23 lb | Yes |
| KitchenAid bowl-lift (5.5-6 qt) | About 16.5 in | 29-32 lb | Barely |
The standard gap between countertop and upper cabinets is 18 inches, so a 13.9-inch tilt-head fits with about 4 inches to spare — but only with the head down. A 16.5-inch bowl-lift fits too, yet leaves so little room you cannot lift the bowl out without sliding the mixer forward. Measure your own gap first.
Also measure the footprint: the Artisan is 8.7 inches wide and 14.1 inches deep, so it needs a spot at least 10 by 15 inches. If you are comparing models, our guide to the best stand mixer for small kitchens breaks down the compact options, and the KitchenAid vs Cuisinart stand mixer comparison covers how the two brands differ.
What are the 9 best stand mixer storage ideas?
These nine ideas run from simplest to most involved, and the first three need no tools at all.
1. Keep it on the counter in a corner spot
The simplest storage idea is no storage at all: give the mixer a permanent home in a back corner of the counter, out of the main prep zone but always plugged in and ready. This suits daily bakers — the mixer earns its counter space by being used.
Set it on a thin sliding mat — typically $12 to $25 — so you can pull it forward to use and push it back when done. Without the mat, dragging a 23-pound mixer across the counter is the friction that makes people stop baking.
2. Build an appliance garage
An appliance garage is a small cabinet on the counter, usually in a corner, with a roll-up or flip-up door that hides the mixer while leaving it plugged in. The mixer never moves, yet the counter looks clear when the door is closed.
Freestanding appliance garages cost about $45 to $120 as of November 2026. Before buying, check the interior height — many top out at 16 inches and will not fit a bowl-lift mixer — and the depth, since the mixer needs about 15 inches plus room for the door. Park it over an outlet.
3. Install a spring-loaded cabinet lift
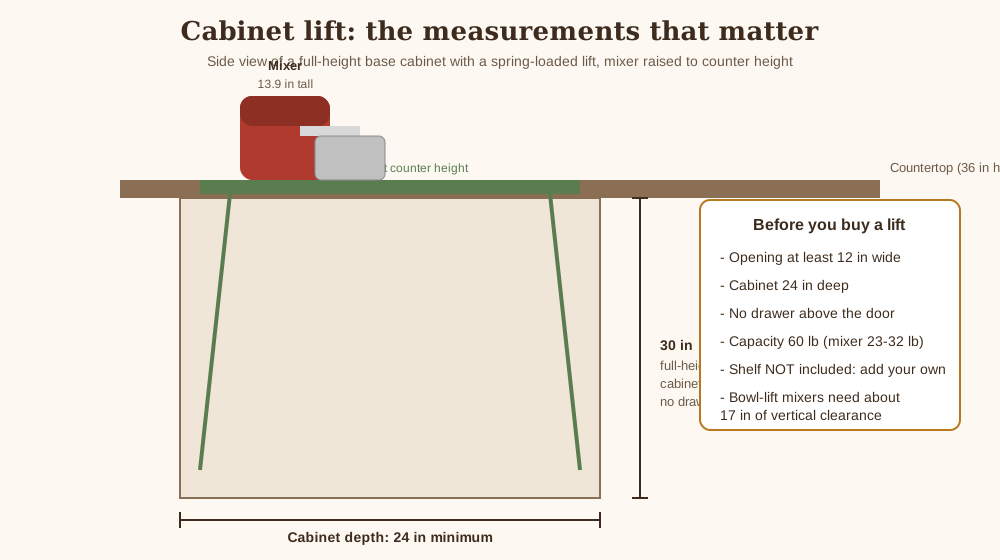
A cabinet lift is the best storage solution for most kitchens: a spring-loaded platform inside a full-height base cabinet that swings the mixer up to counter height when you open the door, and drops it back down when you are done.
The most widely used hardware is the Rev-A-Shelf heavy-duty appliance lift (model RAS-ML-HDCR): about $149.99 as of November 2026, supports up to 60 pounds, and fits cabinets with a frame opening at least 12 inches wide. That rating covers even the heaviest bowl-lift mixers, and the spring tension adjusts so the platform rises smoothly.
The catch is the cabinet: full-height, no drawer above the door, at least 24 inches deep, shelf not included — supply your own 3/4-inch shelf, about 13 by 20 inches. Renters usually cannot install one, but with a suitable cabinet, the mixer feels weightless.
4. Add a full-extension pull-out shelf
If a lift is more hardware than you want, a pull-out shelf is the simpler upgrade: a heavy-duty sliding shelf lets the mixer glide forward, so you lift it straight up onto the counter instead of reaching into the dark back of the cabinet.
Look for full-extension slides rated for at least 50 pounds — the mixer plus the shelf — and a shelf at least 15 inches deep. Kits typically run $50 to $100 as of November 2026. Store the mixer with the bowl attached and the head down.
5. Park it on a rolling cart
A sturdy rolling cart turns the mixer into a mobile baking station: mixer on top at counter height, bowls and flour below, rolled to the counter when you bake and back to a pantry when done.
The cart needs locking casters, because a mixer vibrates while kneading dough, and a cart that rolls mid-mix is a hazard. It also needs a weight rating above the mixer’s weight — at least 50 pounds on the top shelf — and a top at least 16 inches deep. Rolling carts typically cost $40 to $90 as of November 2026: the cheapest way to give the mixer a home without touching your cabinets, and the best option for renters.
6. Give it a pantry shelf at waist height
If you have a walk-in pantry or a tall cabinet with adjustable shelves, give the mixer a shelf at waist height — roughly 30 to 36 inches off the floor. At that height you slide it out toward you instead of hoisting it up: the easiest manual carry.
Reserve the shelf for the mixer alone, with the bowl and attachments beside it or in a bin below — a shared shelf is a shelf the mixer gets buried on. Near the kitchen, this rivals a cabinet lift; down a hall, it suits only occasional bakers.
7. Use a deep drawer or a dedicated baking cabinet
A deep base-cabinet drawer — the kind built for pots and pans — can hold a mixer if it is at least 15 inches deep and the mixer fits head-down. It fails when the drawer is too shallow and the mixer sits at an angle.
A better version is a dedicated baking cabinet: one wide base cabinet, or one shelf of a tall cabinet, holding the mixer, bowls, flour, and pans together. Everything for baking lives in one place — open one door and the station is there. Choose this during a remodel.
8. Put it on a heavy-duty wall shelf
When cabinets and counters are both full, the wall is the remaining surface: a heavy-duty floating shelf mounted into studs can hold a mixer as a display piece.
The shelf and brackets must be rated well above the mixer’s weight — look for a 50-pound rating or higher — and the screws must go into studs, not drywall anchors alone. The shelf should sit about 48 to 54 inches off the floor, so you can lift the mixer off with both hands and set it on the counter below. Skip this if anyone in the household has a bad back.
9. Store it in a nearby closet with an attachment station
The last idea is the simplest to execute and the easiest to get wrong: move the mixer to a nearby closet or hall cabinet, and keep everything it needs in one labeled bin beside it. The mixer is only half the problem — the bowl and attachments are the other half.
Use one clear bin for the attachments and a small bin for the bowl, and keep the cord wrapped loosely around the mixer’s base. Keep the bin on the same shelf as the mixer. This works for occasional bakers with a closet within a few steps of the kitchen; it fails when the closet is far away.
How much does each storage option cost?
The table below uses typical US prices as of November 2026.
| Storage option | Typical cost | Best for |
|---|---|---|
| Counter corner + sliding mat | $12-$25 | Daily bakers |
| Rolling cart | $40-$90 | Renters |
| Freestanding appliance garage | $45-$120 | Weekly bakers |
| Pull-out shelf | $50-$100 | Deep cabinets |
| Pantry shelf at waist height | $0 | Occasional bakers |
| Cabinet lift (Rev-A-Shelf RAS-ML-HDCR) | About $150 + shelf | Weekly bakers |
| Wall shelf (heavy-duty) | $40-$120 | Small kitchens |
The cheapest good answer is the counter corner with a sliding mat; the best is the cabinet lift. Pick the one you will actually use every time you bake.
How do you store stand mixer attachments and bowls?
Attachments cause more clutter than the mixer: small, oddly shaped, easy to lose. Keep the flat beater, dough hook, and wire whip together in a small bin on the same shelf as the mixer, or in a drawer with dividers. Never store the wire whip loose at the bottom of a drawer, where its wires bend.
Store the bowl upside down on top of the mixer when it lives on the counter — this keeps dust out and stops the bowl from becoming a catch-all. In a cabinet, store the bowl beside the mixer: one stored inside raises the total height and can trap moisture. Wipe attachments dry before storing them, because coated beaters chip when knocked around wet.
What mistakes should you avoid when storing a stand mixer?
The most common mistake is storing the mixer where it is hardest to reach: a low shelf forces a bent-over, two-hand lift of 23 to 32 pounds, and most people stop using a mixer stored that way. If the only free spot is low, add a pull-out shelf or a lift.
The second mistake is forgetting the cord: a cord left dangling catches on cabinet doors, and a cord pinched in a door is a damaged cord, so wrap it loosely around the base. The third mistake is storing the mixer wet — standing water invites rust and a musty smell, so dry everything first. Finally, lock the head down: an unlocked head can drop when the cabinet is bumped, chipping the bowl or pinching a finger.
Where should you never store a stand mixer?
Never store a stand mixer in a garage, a basement, or any damp space with big temperature swings. Manufacturer guidance assumes normal indoor conditions; damp air invites rust and condensation inside the motor housing.
Do not store it on top of the refrigerator either: the top vibrates, runs warm, and is too high for a safe two-hand lift. And never lift a stand mixer above shoulder height.
Frequently asked questions about stand mixer storage
Should a stand mixer be stored on the counter or in a cabinet?
Store it on the counter if you bake more than once a week, and in a cabinet with a lift or pull-out shelf if you bake less often. A mixer that is hard to reach does not get used.
Can a stand mixer fit in a standard kitchen cabinet?
A tilt-head mixer fits in most standard base cabinets: at 13.9 inches tall it clears a typical 30-inch base cabinet. It often does not fit in a standard upper cabinet, usually only 12 inches deep, and a bowl-lift may not fit inside an appliance garage at all.
Is a cabinet lift worth it for a stand mixer?
A cabinet lift is worth it if you bake weekly and cannot lift 23 to 32 pounds comfortably from a low cabinet. The hardware costs about $150 as of November 2026 and removes the lifting.
The right storage makes baking easier, not harder. Measure your mixer, be honest about how often you bake and how much you want to lift, and pick the idea that matches. Easy to reach gets used; easy to hide gets forgotten.