
Wash a wooden cutting board with hot water and mild dish soap after every use, dry it standing upright, and oil it with food-grade mineral oil once a month — more often when the wood looks pale or dry. Never put it in the dishwasher or soak it in the sink. A board cared for this way can last decades.
A good wooden cutting board is one of the few kitchen tools that gets better with age — if you look after it. A $60 end-grain maple board oiled on schedule can outlast three $20 boards left wet in the sink. The routine is short: wash, dry, oil, repeat.
We based this guide on manufacturer care guidance from board makers such as John Boos and Teakhaus, plus specs, prices, and verified owner reviews.
Why do wooden cutting boards need special care?
Wood is porous: every cut opens tiny channels, and water, food juices, and oil all find their way in. That porosity is also what makes wood boards kind to knives — but only when the wood is sealed and dry.
An unoiled board absorbs water every time you wash it. The wet fibers swell, then shrink as they dry, and over dozens of cycles the board cups, bows, or splits along a glue line. Oil fills the pores and keeps the wood stable — the whole logic of board care is to keep water out, keep oil in, and never let the board stay wet.
Hard maple is the standard for American cutting boards because its tight grain resists deep cuts; walnut hides stains better, and teak is naturally oily so it needs oiling less often. End-grain boards are gentler on knife edges but drink oil faster when new.
How do you clean a wooden cutting board after every use?
Daily cleaning takes about two minutes and is the most important habit in board care — a board washed and dried properly after every use rarely needs rescue work.
Step 1: Scrape off food scraps. Use a bench scraper to push food bits into the trash before the board goes near water — wet crumbs turn into paste in the grain.
Step 2: Wash with hot water and mild dish soap. Scrub both sides, edges, and underside under hot running water with a sponge and a small amount of soap.
Step 3: Rinse well. Rinse until the water runs clear — soap residue left in the grain can turn stale.
Step 4: Towel-dry immediately. Wipe both faces and all four edges with a clean dish towel — never leave the board flat on the counter to air-dry, since trapped moisture underneath is a classic cause of warping.
Step 5: Stand it upright to finish drying. Lean it against the backsplash or stand it in a rack with air on both sides. It dries fully in 1–2 hours; only then should it go back in the cupboard.
Never soak a wooden board in the sink — the wet side swells while the dry side does not, and the board cups. Never put it in the dishwasher either: heat, water, and detergent strip oil from the wood and can crack glue joints. Every major board maker lists the dishwasher as the number one thing to avoid.
Standard food-safety guidance is to wash the board with hot, soapy water immediately after cutting raw meat or poultry, and to keep raw-meat boards separate from boards used for ready-to-eat foods.
How often should you oil a wooden cutting board?
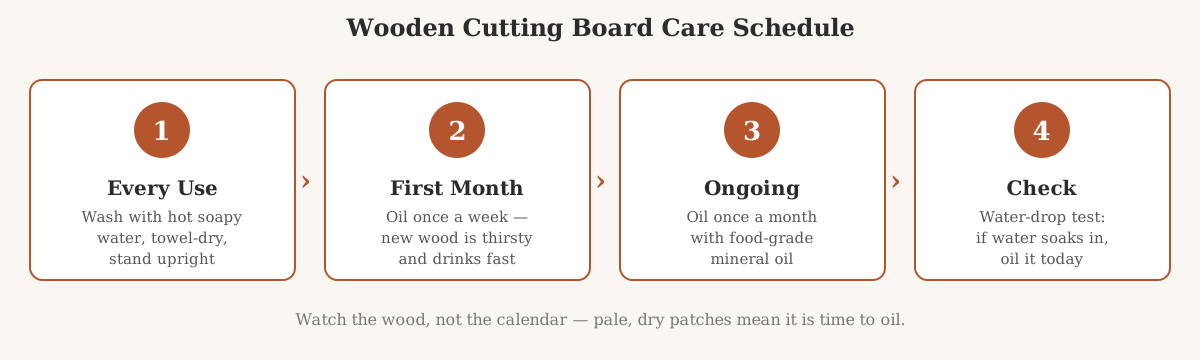
Oil a new board once a week for the first month, then once a month for regular use. Daily heavy prep may need oiling every two to three weeks; light use once a week may only need it every six to eight weeks.
The calendar matters less than the wood itself. Try the water-drop test: flick a few drops onto the surface. If they bead up, the board still has enough oil; if the water soaks in and darkens the wood within seconds, oil it that day.
A board in a dry winter kitchen loses oil faster than one in a humid summer kitchen. Watch the wood, not the calendar: pale, dry patches are the board asking for oil.
| Board situation | Oiling frequency |
|---|---|
| Brand-new board (first month) | Once a week |
| Daily use, heavy prep | Every 2–3 weeks |
| Daily use, normal prep | Once a month |
| Light use (a few times a week) | Every 6–8 weeks |
| Teak board (naturally oily wood) | Every 2–3 months |
What kind of oil should you use on a wooden cutting board?
Use food-grade mineral oil. It is the standard recommendation from board makers because it is colorless, odorless, tasteless, and does not go rancid. Cooking oils such as olive or vegetable oil spoil in the grain and can leave a stale smell within weeks.
Sold as “butcher block oil,” it costs about $8–$12 for a 12-ounce bottle as of November 2026 — one bottle lasts most households a year or more. Look for “food grade” or “USP” on the label; industrial mineral oil is not meant for food-contact surfaces.
Board butter — food-grade mineral oil blended with beeswax, about $10–$15 a tin as of November 2026 — leaves a thin water-resistant layer on top of the oil. Use it after oiling, not instead of it: oil soaks in, wax seals the surface.
| Product | What it does | Price as of November 2026 |
|---|---|---|
| Food-grade mineral oil | Soaks into the grain | About $8–$12 per 12 oz bottle |
| Board butter (mineral oil + beeswax) | Seals the surface | About $10–$15 per tin |
| Vegetable, olive, or coconut oil | — | Never — goes rancid |
Pure food-safe tung oil gives a harder finish but needs 24 hours per coat to dry. For most home cooks, mineral oil plus board butter is simpler and perfectly adequate.
How do you oil a wooden cutting board step by step?
Oiling takes about five minutes of active work plus an overnight soak — do it in the evening so the board can drink the oil while you sleep.
Step 1: Start with a clean, completely dry board. Wash with hot soapy water and let it dry fully — at least a few hours, or overnight — since oil will not soak into wet wood.
Step 2: Pour on a generous amount of mineral oil. Flood the surface — a new board can drink a quarter cup in one session — and spread it over the face, edges, and underside.
Step 3: Let it soak. Leave the board flat, oiled side up, for at least 4–6 hours — overnight is better. Add more oil to any patch that looks dry.
Step 4: Wipe off the excess. In the morning, wipe the surface with a clean rag until it feels dry, not greasy — leftover oil stays sticky and attracts dust.
Step 5: Apply board butter (optional, but recommended). Rub a small amount over the surface in thin, even strokes, let it sit for a few hours, then buff off the excess.
Step 6: Repeat on the other side. Oil the underside too, or the two faces absorb moisture at different rates and the board can cup.
For a brand-new board, repeat once a week for the first month — new wood is thirsty, and the first few oilings disappear into the grain. After a month, switch to the monthly schedule.
What should you never do to a wooden cutting board?
Most board damage is not wear and tear — it is one of a handful of avoidable mistakes.
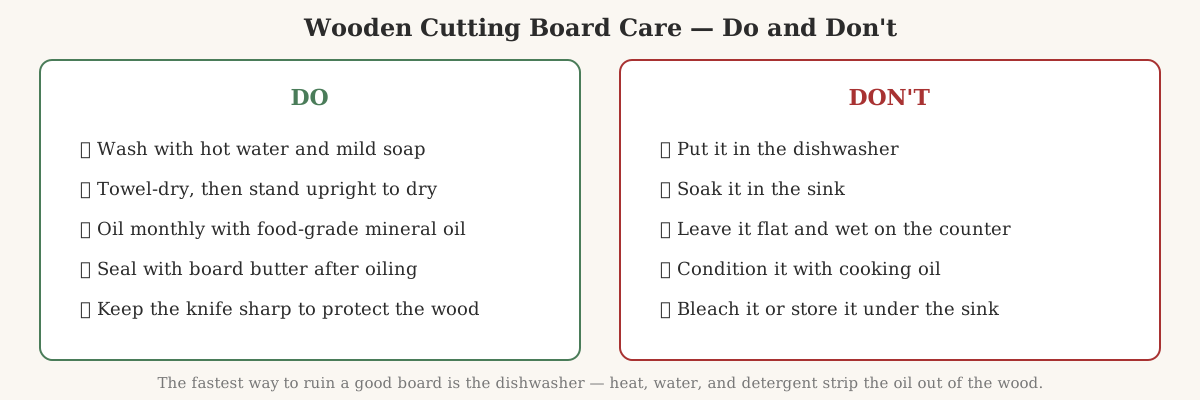
Never put it in the dishwasher. Heat, water, and detergent strip oil from the wood and stress the glue joints — the fastest way to ruin a good board.
Never soak it in the sink. A board left in water swells unevenly and warps.
Never leave it flat and wet on the counter. Water trapped under a flat board has nowhere to go. Stand it upright so air reaches both faces.
Never use cooking oil to “condition” it. Olive, vegetable, and coconut oil all go rancid in the grain. Use food-grade mineral oil only.
Never cut with a dull knife. A dull knife tears wood fibers instead of slicing cleanly, roughening the surface. Our guide to how to sharpen a kitchen knife at home covers the simplest way to keep an edge keen.
How do you remove stains and odors from a wooden cutting board?
Wooden boards pick up stains from beets, turmeric, and berries, and odors from garlic and onion. Both are fixable with ingredients already in the kitchen.
For odors: sprinkle coarse salt over the board and scrub with half a lemon — the salt abrades gently and the lemon’s acidity neutralizes onion and garlic smells. Let it sit 5–10 minutes, then wash and dry. For stubborn odors, leave a baking soda paste on for 10–15 minutes, then rinse.
For stains: the same lemon-and-salt scrub lifts most surface stains. For deeper stains, leave a baking soda paste on for several hours or overnight. Turmeric stains may only fade over days of normal use.
For stuck-on food: scrape with a bench scraper, then scrub with coarse salt and water. Avoid steel wool — it leaves fine scratches — and never bleach a wooden board: bleach dries the wood and can damage glue joints.
How do you sand and refinish a worn wooden cutting board?
A board with deep knife grooves, stubborn stains, or a rough surface is a candidate for refinishing — sanding removes the damaged top layer and exposes fresh wood. A board can be refinished several times over its life.
Step 1: Sand with 120-grit sandpaper. Work with the grain in even strokes over the whole surface so the finish stays even, then wipe away the dust with a damp cloth.
Step 2: Sand again with 220-grit sandpaper. The finer grit smooths the surface left by the first pass. Wipe away all dust — any left behind will mix into the oil and feel gritty.
Step 3: Oil it like a new board. A freshly sanded board is bare wood again: oil once a week for the first month, then back to the normal schedule.
Do not sand an end-grain board aggressively — light 220-grit sanding is usually enough, and removing too much material can expose glue joints. A board that is cracked through or has a split glue joint cannot be saved by refinishing.
How should you store a wooden cutting board?
Store the board upright, in a dry place, with air circulating on both sides — a board rack or simply leaning against the backsplash both work. A board stored flat traps moisture underneath.
Keep it away from direct heat — not above the stove or in a sunny window — since heat dries one side faster and invites warping. The area under the sink is the worst storage spot in most kitchens. Store several boards with a small gap between them, not stacked flat.
When should you replace a wooden cutting board?
A well-cared-for wooden board lasts years, often decades. Replace it only when the damage is structural: a crack running through it, a split glue joint, or a warp so severe it rocks on the counter. Replace it if deep grooves remain after sanding, or if a persistent smell survives washing, lemon, and baking soda.
Cosmetic wear is not a reason to replace a board — knife marks and a darker patina are signs of a board used well. If it is still flat, solid, and smooth after sanding, it has years left in it.
If you are weighing a switch to a different material, our comparison of stainless steel cutting boards covers the trade-offs, and our look at whether Epicurean cutting boards are safe covers a wood-fiber composite option.
Frequently asked questions
Can you put a wooden cutting board in the dishwasher?
No — the heat, prolonged hot water, and detergent strip oil from the wood and can crack glue joints.
How often should I oil my wooden cutting board?
Once a week for the first month, then about once a month. Use the water-drop test: if water soaks in instead of beading, it is time to oil.
What oil is safe for a wooden cutting board?
Food-grade mineral oil — colorless, odorless, and it does not go rancid. Board butter (mineral oil and beeswax) adds a water-resistant seal. Never use olive, vegetable, or coconut oil, which spoil in the grain.
How do I get the onion smell out of a wooden cutting board?
Scrub with coarse salt and half a lemon, let it sit 5–10 minutes, then wash and dry upright. For stubborn odors, a baking soda paste left for 10–15 minutes works well.
How long does a wooden cutting board last?
Years, often decades. Regular oiling, prompt washing and drying, and occasional sanding keep it in service; only cracks, split glue joints, or unfixable deep grooves mean replacement.